Documentation: YNYS FAWR PERSONA CHALLENGE AS XXXXI (2007)
Entry by Varakreivitär Kareina Talventytär, O.L.
Introduction
The following article is the documentation I used for my entry for the Ynys Fawr Persona Challenge, held at the Newcomer’s Feast in March AS XXXXI. We were required to enter three items of clothing or accessories from one time/place within SCA period (pre-1600). I chose to make a bliaut, a ceinture, and fouriaus, all done in a style popular among noble women in France in the 12th Century.
The Bilaut
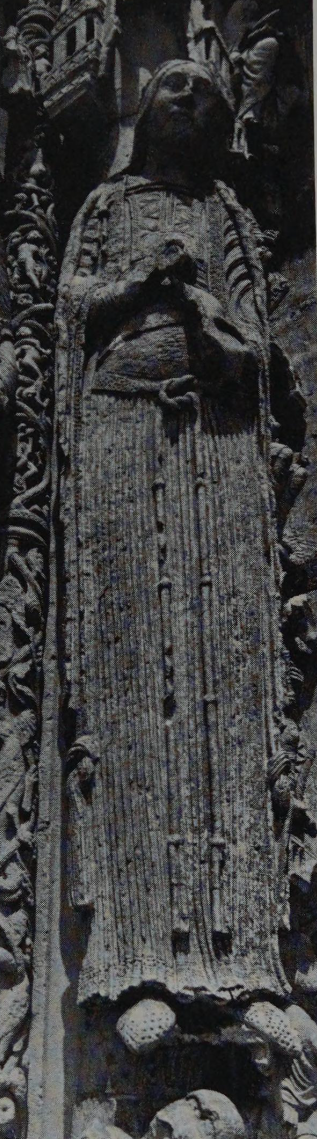
The definitions of bliaut are given in Goddard (1925) as “I, a costly material ; II, a lady’s court dress III a man’s dress worn with armour or at court”. A common usage of the term today seems to be for any of the 12th Century style of gowns which are fitted at the waist, but full and long in the sleeves and skirts, such as are depicted in the statues of Chartres Cathedral, which date to 1140 AD (Stoddard 1987, 1952).
The Fabric
The women of these statues are wearing long flowing gowns with loose sleeves, which hang down towards their knees. Ideally, to achieve the sort of drape of the skirts depicted by the statues one would wish to make the bliaut out of a nice lightweight silk. That silk was used for this purpose in the period in question can be confirmed by reading the literature of the day “And before the third day has passed, I shall send you plenty of gold and silver, of dappled and grey furs, and precious silken stuffs wherewith to adorn yourself and your wife my dear lady.” (Owen 1987: Vv. 1320-1352). However, I suspect that the silk fabric I have used for my bliaut isn’t the most appropriate weave. This particular fabric is full of slubs and other imperfections, and as such would likely have been considered inferior. I do not believe that such poor work would have been used for court clothing. The only reason I used it, rather than something with a better quality weave (not to mention a drape which better matches the folds of fabric represented in the statues), is because I had been given this fabric as a gift, and thought it better to use the fabric I had on hand than to purchase new fabric.
The cut of the gown
I have opted to use the geometric “rectangles & triangles” style of construction which typifies early Medieval clothing (Forest 1996). Since I wanted very full skirts, and I was working with a limited amount of narrow fabric, I chose to use many small gores which I assembled out of three triangles each (Figure 1 & Table 1). I inset them over each thigh (Figure 2) as well as at the sides of the gown. The drape of the sleeve is achieved via attaching a large square and several small triangles. My sleeves are shorter than those on the Chartres statues, but they are similar in appearance to the man’s sleeve in Figure 3 (Platt 1979, page 65).
Embellishment
For the embellishment of my bliaut I have chosen to mimic the leaf-like pattern (Figure 4) seen on Chartres, LP.LI (statue location notation as in Stoddard 1987, 1952). The embellishment of this neckline could have been accomplished on garments via weaving, embroidery, appliqué, or even via paint or resist-dying techniques. I opted for embroidery because I enjoy doing it and it is quick and easy to do. I know that embroidery was done in the 12th Century due to descriptions in literature “The Queen then hastily took her off to her own private room, and gave orders to bring quickly the fresh tunic and the greenish-purple mantle, embroidered with little crosses, which had been made for herself.” (Owen 1987: Vv. 1479-1690).
The quality of the photo printed in the book did not give me sufficient information as to the details at the edges of the pattern—in one area they look like straight lines, in another they look more like a zig-zag pattern, and in a third they look like a checkerboard pattern. I have opted to use straight parallel lines for that section of my embroidery thus far, but intend to add further embellishment to that portion later. That edge portion may have represented a woven border (such as a tablet woven band) for the neckline, or embroidery, or perhaps the lines represent some other attached embellishment like beads. Either way, the pattern is repeated in a narrow band along the edges of the sleeve and at the hem (Figure 5).
Because I liked the effect, I opted to use a contrasting colour silk fabric as the base for the embroidery. I chose to use plain cotton embroidery floss for the stitching, not because I thought it was the period option (silk and wool would be much better choices!) but because I already had it on hand and didn’t need to go shopping for it. I have not added more of the red silk to the hem of the gown due to the limited quantity I had available. The fabric I used to back the hem is cotton, not because it is an appropriate period choice, but because it was in my stash of scrap fabric. (Backing the hem instead of doing a full-rolled hem meant that the dress could be that tiny bit longer, and given the limited amount of fabric I had to start with, this is a good thing). Due to time constraints I’ve not yet repeated the embroidery pattern on the contrasting edging on the sleeves, though I intend to do so later. As I did not have sufficient red silk to trim the hem, I am considering adding red embroidery to the hem in the same pattern as will be on the sleeves (and is already on the edges of the neck) to echo the pattern in the opposite colour scheme.
The ceinture
I have chosen to use the same style of ceinture (a lady’s silk belt: see Goddard 1925) as is depicted on the Chartres statue with LP.LI. The statue (Figure 5) shows a belt, likely made of cloth in the original, wrapped around the waist and then again around the hips, attached to a cord or rope, which is tied and hangs down past the knees. I chose to use the same fabric for the surface of the belt as I did for the edging on the gown and will embellish it with the same embroidery floss as used on the gown (though Goddard (1925) suggests that silver or gold embroidery would be correct). I’ve backed the silk with some of the heavy wool which was given to various members of the Barony by Sasha, in part because I had it readily available, in part because I felt it would give a nice weight and add thickness to the belt to match that shown on the statue, and in part because I felt that the wool would add a bit of grip to the belt, helping it to stay in place. The rope portion is made of cotton cording which I dyed using modern chemical dyes. (The fabric of the belt and gown is commercially produced, and as such, would have been coloured with chemical dyes, therefore they are consistent with one another, though not authentic in that respect.) I don’t know what fibre the original belt cord would have been twisted from, but the cotton was available at Spotlight, and was far better than the synthetics on offer.
Fouriaus
Fouriaus are sheathes covering braids or bourre (false hair) (Goddard 1925). I’ve opted to use the same silk for the casing as I used for the belt and trim on the bliaut. I’ve stuffed the fouriaus with spare cord from the belt, and added a friend’s hair (given to me when he cut it off) to the ends to help give the impression that the enclosed braids are all mine.
References
- Forest, M. (1996). “T-tunics: The Period Way by Muireann ingen Eoghain ua Maoil Mheaghna.” Tournaments Illuminated(117). Online at: http://www.forest.gen.nz/Medieval/articles/Tunics/TUNICS.HTML)
- Goddard, E. R. (1925). Women’s Costume in French Texts of the Eleventh and Twelfth Centuries. The Johns Hopkins Studies in Romance Literatures and Languages, Vol. VII. Paris, Universitaires de France: 263.
- Owen, D. D. R. (1987). Chretien de Troyes Arthurian Romances. London, J. M. Dent & Sons Ltd.
- Platt, C. (1979). The Atlas of Medieval Man. New York, St Martin’s Press.
- Stoddard, W. (1987, 1952). Sculptors of the West Portals of Chartres Cathedral Their Origins in Romanesque and Their Role in Chartrain Sculpture Including the West Portals of Saint-Denis and Chartres, Harvard, 1952. New York, W.W Norton & Company, Inc.
Figures
Figure 1: The cut of the bliaut:

Figure 2: The assembled layout of the bliaut
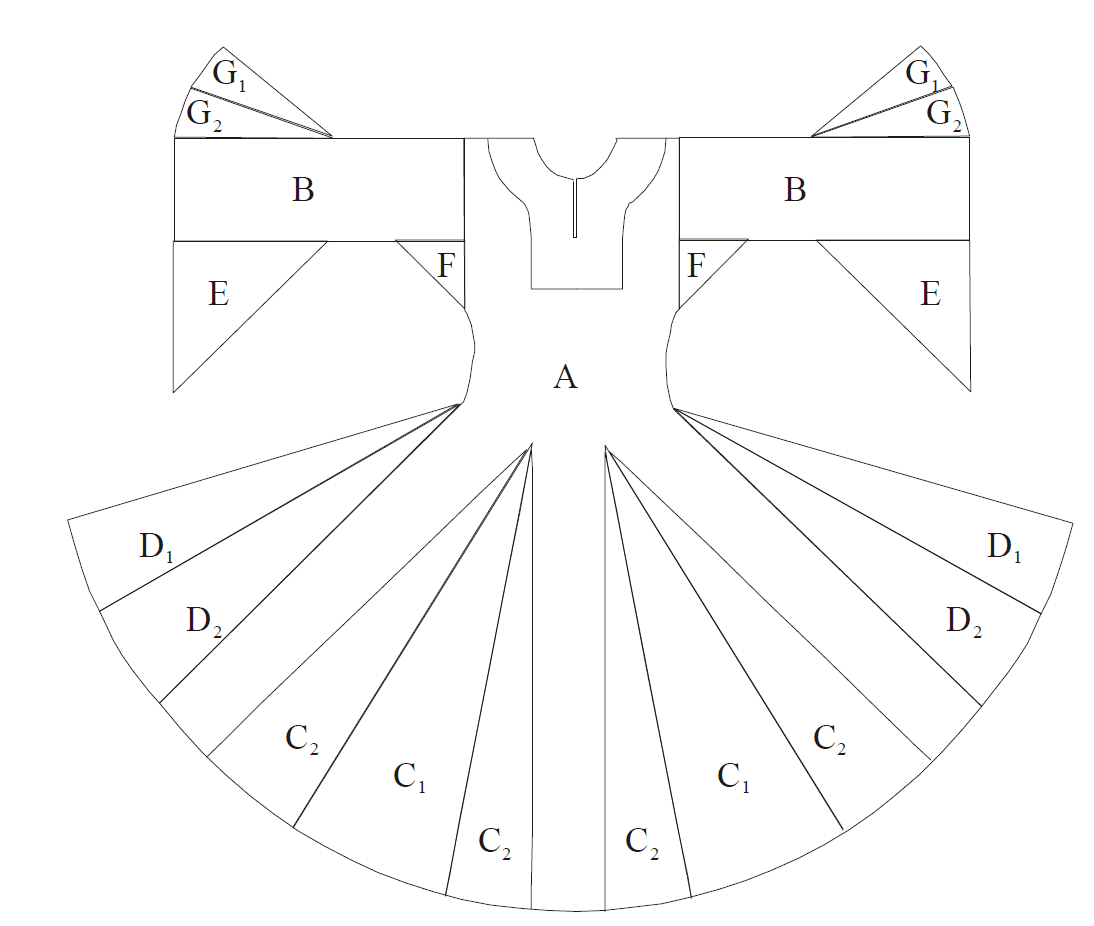
Table 1: Key for cutting diagram
| Code | description | measurements |
|---|---|---|
| A | Body rectangle | shoulder to shoulder & shoulder to hem |
| B | Sleeve | shoulder to wrist |
| C1 | Gores set over thighs (big triangles) | top of thigh to hem (+ max width possible given fabric) |
| C2 | Gores set over thighs (small triangles) | top of thigh to hem (+ max width possible given fabric) |
| D1 | Side gores (big triangles) | hip to hem (+ max width possible given fabric) |
| D2 | Side gores (small triangles) | hip to hem (+ max width possible given fabric) |
| E | Lower sleeve gores | elbow to wrist |
| F | Underarm gores | width of torso at that point |
| G1 | Upper sleeve gores (big triangles) | elbow to wrist (+ max width possible given fabric) |
| G2 | Upper sleeve gores (small triangles) | elbow to wrist (+ max width possible given fabric) |
| Neckline | Shown for reference—I did a contrasting colour neckline in this shape |
Figure 3: Man’s bliaut
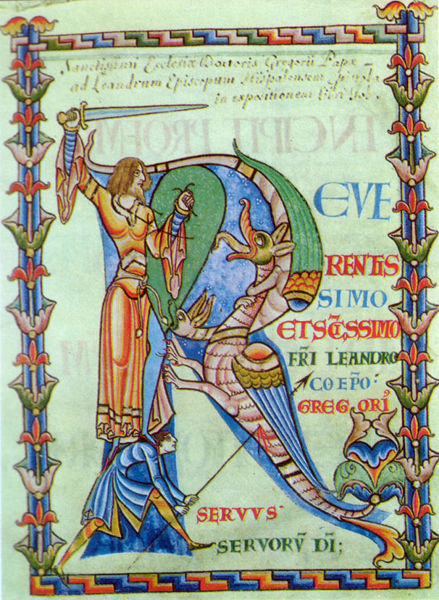
Figure 4: Leaf-like neck embellishment
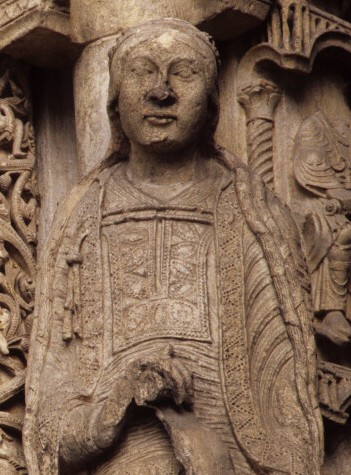
Figure 5: Chartres LP.L3