Initial plan
I thought should be able to get a reasonable bliaut from the silk I bought at Cudgel, the Midnight blue silk and the Dusky plum silk. However, when I looked at them later, I realised that the Bright plum silk is a much better texture and match for the Midnight blue silk, and the brighter tone to its colour also works better.

Progress log
- 2026-02-11 packing for this weekend ironed it, and noticed two places where the back side of the seam had caught an extracfold of the fabric, so I freed them and re-stitxhed those bits of the seam
- 2026-01-27 embroidery along the parts of the sleeve I hadn’t finished yet
- 2026-01-10 got it wearable at the event (12th Night)
- 2026-01-09 road trip sewing
- 2026-01-07 I got the last of the small final pieces cut out
- 2026-01-05fixing problems caused by cutting mistakes
- 2026-01-04 more seams
- 2026-01-03 a little progress
- 2026-01-02 story submitted started working on the neckline. Got the exterior facing sewn to the neck hole (so I can now try it on) And started doing the embroidery along that edge
- 2026-01-01 starting the year off right To fix the sleeve problem I opened up the seam between the front and back sides of the seam. Then I spread the side that is primarily blue on the table and used it as the pattern for how the mostly plum side should look.
- Since this should have been a left sleeve, and is a right sleeve, it means the colours are in the opposite position than they should be. To solve this I did a diagonal cut (green line in the sketch) to separate the pendant part of the sleeve (A) from the arm part of the sleeve (B), and unpicked the seam attaching the upper arm three-colours section (C) from the rest of the sleeve.
- Then I rotated part B and attached it to the other side of A. This piece isn’t symmetrical, so rotating it means that it is too big on one edge, and not big enough on the other (but I can’t just flip it, as the underside of the fabric is a different colour, which is how this problem came up in the first place). So I trimmed off the extra wide rectangular bit, and then took a scrap of the plum to fill in the missing triangle, before re-attaching part C.
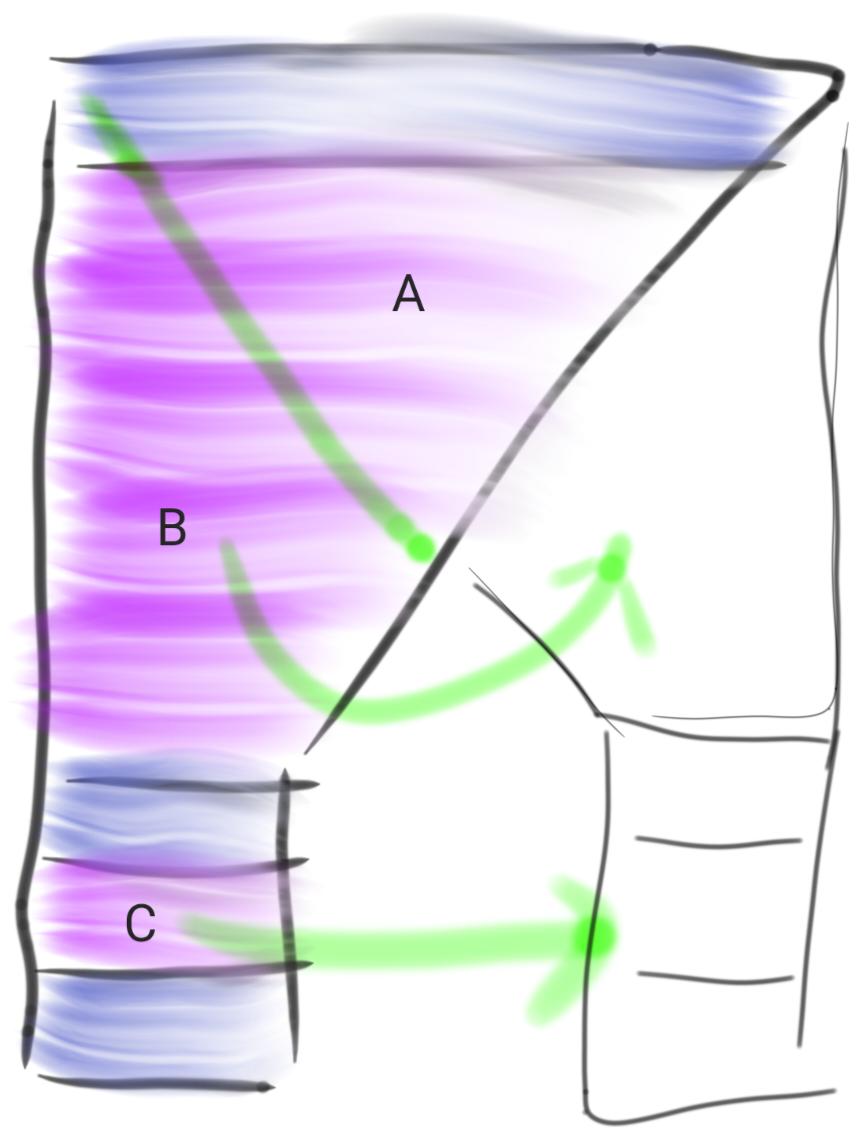
- The result is a sleeve half that has the correct colours in the correct position to be a left sleeve. But now it is late, and I am tired, so I have taken notes so I can do this for the other half of the sleeve tomorrow.
- Is this pieced sleeve optimal? Nope. It looked better before I cut it up and put it back together. However, better this than messing up the alternating colour patterns, so I have to cope.
- 2025-12-31 nyårsafton I finally got the body far enough along to start attaching the sleeves, when I realised that my mistake in cutting it out (where I failed to take into consideration that the fabric has a very different colour on its right side than it has on the wrong), resulted in my winding up with two right sleeves. I managed to fix the problems body with the body with piecing, but working of if this is possible for the sleeves is more thinking than one wants during a party, so I set it asside to deal with later
- 2025-12-27 shopping and guests sewing while chatting with Hjalmar and Sofie
- 2025-12-26 a little more progress center back seam done, front center seam started
- 2025-12-25 a day at homeI took the pieces and spread them out to figure out which pieces go where, and which one still needs modifications to solve the problem with cutting it wrong, and fixed it.
- 2025-12-16 enough with the melting already, just give me winter, please! determined which quadrant that had been cut thinking it is a front quadrant has to be a back quadrant, so i opened up the seam that had been sewn wrong, then found a bit of scrap exactly the correct angle to fill the missing triangle to attach the skirt to a back upper body.
- 2025-12-12 Weather still ok finished the seam I started a couple of days ago.
- 2025-12-10 birthday snow! I picked the project back up, after weeks of being too busy to sew, and sewed the front and back of a sleeve together
- 2025-10-11 smithy and games night woke to the thought that there is really only one problem with the inside out pieces, the cut of the waist seam. So if I take the panel intended to be the back purple skirt and make it the front I can simply trim the waist down to the matching slope. Likewise, if i use the one that was cut to be a front purple as a back, ai can just piece in a triangle to be the waist, and, if I use a wrap belt, that seam won’t even show.
- 2025-10-03 errands and socialising, when I went to sew the two front panels together I realised a very serious cutting mistake. While the front and back of the blue fabric are nearly identical, the texture/colour difference in the purple between front/back is huge. Therefore, in order to have the same side out in the counter changed pieces, I should have cut one side out with the neck to the south of the fabric, and the other to the north, so when half of the pieces were flipped they would all have the same colour out
- 2025-09-20 some assembly required cut out the tunic, parti coloured, front waist drops to a point, back does not. Due to a cutting error the upper arms are three pieces.
- 2025-09-15 in which I didn’t cut fabric I decided that I need to use the https://trello.com/c/K6WJRFm7 I bought from Sofie, with the https://trello.com/c/DPSGM4sR I bought at Cudgel for this project, even though it is smaller. The two silks are closer to the same texture
Notes/calculations to decide how to cut it
My nearly-full full circle skirt ( 2021 Two Blue herringbone wool split-skirt bliauts ) measures:
- 632 cm circumference at 155 cm from shoulders
- 490 cm circumference At 20 cm from bottom hem
- 384 cm at 40 cm from bottom hem
- 314 cm at 52 cm from bottom
Therefore, to mke a full circle skirt with one narrow (12 cm), and one wide (20 cm) band around the skirt, I need:
- one blue band 21 cm wide x 623 cm (so needs three full-width 161 cm) bias cut bands plus 140 cm more)
- one blue band 13 cm wide x 384 cm (so two full-width 161 cm) bias cut bands plus 62 cm more)
- one purple band 21 cm wide x 490 cm
- two pruple body pieces with a 314 cm wide curced bottom hem
- one blue neckline
- 4 blue cuffs
If starting 86 cm from a blue corner, which leaves just enough for 1 neck, the first blue strip is 93 cm on the short side, and 123 cm on the long.
However, if going from a corner, the diagonals will all be 161 cm long, on both edges
- 2025-07-19 started playing with cutting diagrams, using the pattern from my original bliaut <C:\Users\Riia\Documents\Corel files\SCA\costume\purple blue silk bilaut.cdr>. One possibility, which doesn’t look so period, but works with the fabric, is a blue body and sleeves, and purple gores. If I wanted to do parti-coloured instead it would need to be smaller, as the blue is so much smaller than the purple. Likewise, if I want to do like the initial sketch, with a purple body and blue trim it would need to be smaller, as the purple isn’t enough to do a whole dress plus big sleeves
- another possibility would be to also use the Bright plum silk I bought from Sofie, which is very similar colour to the purple, but a very different texture, and much lighter.
what needs doing
- Determine layout
- cut out the pieces
- sew 1st sleeve cuff to sleeve
- turn cuff to the outside and stitch it in place with the thread from the Blue silk thread rolls
- baste the cuff into place, turn under the inner edge, invisible stitch it fown, and the decorative sew along the edge with the thread from the Blue silk thread rolls
- repeat assembly for sleeve 2
- repeat assembly for sleeve 3
- repeat assembly for sleeve 4
- plus add a little bit of extra blue on the top corner where the cuff wasn’t attached properly and there was a gap
- sew bottom hem to skirt for quadrant 1
- hem the bottom
- sew body rectangle to skirt for quadrant 1
- sew bottom hem to skirt for quadrant 2
- sew body rectangle to skirt for quadrant 2
- realise that when cutting the fabric you forgot to account for the part where the fabric has a right and a wrong side, with a subtle difference in shinyness betwwen the top and bottom of the Midnight blue silk, and a huge difference in shinyness and evrn colour for the two sides of the Bright plum silk. If the waist had been cut horizontal this wouldn’t matter as I cut pieces for two left and two right sides from each of the two fabrics to assemble into the parti-coloured tunic. However, I cut all of them with the fabric right side up, which means that half of the pieces were cut mirror image of what they should have been, and sewing them together as cut would have resulted in a tunic with two shades of plum and two shades of blue. No thanks. If those body rectangles hadn’t had diagonal waist cuts in front I could have just re arranged the pieces to have everything right side out, but with it the result was two left fronts and two right backs.
- solution: use a bit of scrap to turn the diagonal cut body back into a rectangle so it can be a back piece on the correct side
- fix the skirt piece that should have been a front by cutting it to the correct angle
- sew the remaining body rectangle to the skirt
- sew the left and right back sections together
- finish that seam
- sew the left and right front sections together
- finish that seam
- sew the shoulders together
- sew the right sleeves to the body
- notice that the other sleeve is also a right sleeve
- open the seam between the front and back of the second sleeve
- diagonal cut the plum half of that sleeve into pieces A and B (see 2026-01-01 sketch.png)
- open up the seam between part B and C
- sew A and B together on their other edges
- add a diagonal strip of the Dusky plum silk to make part B big enough on the sloped part.
- trim away the excess bit of part B on the straight side
- sew C back to B
- fill in a small triangle scrap on the back of the sleeve point
- fix the blue half of sleeve two in the same manner as above and attach it to the shoulder
- assemble the scraps for the neck facings
- sew them to where the neck hole should be, abd then cut it
- finish the neckline
- sew the sides shut